In this article we are going to explore one of the Advanced Features of new SharePoint 2013 Search Architecture.
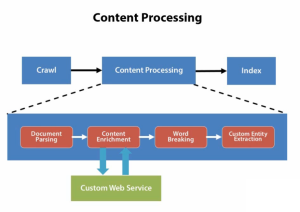
With the evolution of new SharePoint 2013 Search Architecture, SharePoint allows developers to intercept the Content Source Crawl Engine Processing by adding a Custom Step in the Content Processing Mechanism.
If we closely monitor the Content Processing Mechanism, we can identify easily the step where we can hook up the Custom Content Enrichment Service for supporting and extending Content Enrichment process.
Under the hood, this Custom Content Enrichment Service is implementing an interface “IContentProcessingEnrichmentService”, which is having method that can deal with the incoming Items.
We can utilize Custom Content Enrichment Service in the following scenarios:
- If need to push new Managed Properties based on the Content Source being Crawled
- If need to push new Managed Properties based on existing Managed Properties associated with the Content Source being Crawled.
- If we need to normalize the Managed Properties values when we are dealing with Heterogeneous Content Sources.
So in this walkthrough we will see Scenario 2 where we can push new Managed Properties based on values present in existing properties.
In order to setup the test scenario we need a List with two columns “DemoCompany” and “DemoCompanySymbol” as shown below:
Once we got the list ready with columns and data, we have to initiate a full crawl so that the respective Crawled Properties based on these columns are created by the crawling process.
Now once we are done with setting up the content source, next thing is to create Managed Properties we are going to employ in this demo.
We have two types of Managed Properties which we should consider in this Demo:
- Input Properties: These are the Properties which will be supplied to the Custom Content Enrichment Service as Input.
In this case we have DemoCompany, DemoCompanySymbol as Input Properties.
- Output Properties: These are the Properties which will be returned back to SharePoint Crawl from Custom Content Enrichment Service after the Properties are nourished with updated data.
In this case we have DemoCompanyWithSymbol as Output Properties.
Only Input properties must be mapped with the respective crawled properties and Output properties must remain unmapped as they will be updated by the Custom Content Enrichment Service.
Also all these properties should be marked as “Queryable”,”Searchable”,” Retrievable” shown below:
Also pay attention on the Data Type of these properties, as this information will be needed at the time of retrieving their values in our Custom Content Enrichment Service.
With this we are all done with Content Source Definition, Managed Metadata Properties Configuration.
Now the next thing is to start with the Development of Custom Content Enrichment Service as shown below:
- Launch Visual Studio
- Create a new Project of type “WCF Service Application”
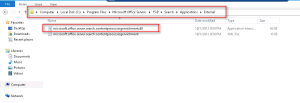
Add a reference to “microsoft.office.server.search.contentprocessingenrichment.dll” which can be located at “C:\Program Files\Microsoft Office Servers\15.0\Search\Applications\External”
Add following using statement to your service class:
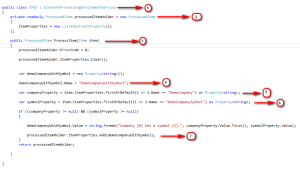
In order to understand the working of this code let’s run Code DNA Test as mention below:
- Inherit the Service Class with the interface IContentProcessingEnrichmentService
- Preparing a variable processedItemHolder of type ProcessedItem to hold the incoming item after processing.
- Implement ProcessItem(Item item) Method of IContentProcessingEnrichmentService Interface to deal with incoming Item.
- Defining OutPut Managed Property as “DemoCompanyWithSymbol” which we need to create before start writing the code for this service as we have already done above.
- Retrieving Input Property DemoCompany, by type casting it as per the Data Type of the Managed Property, like in this case we have a Text type Managed Property so the we are using Type Casting as Property<string>.
- Retrieving Input Property DemoCompanySymbol, by type casting it as per the Data Type of the Managed Property, like in this case we have a Text type Managed Property so the we are using Type Casting as Property<string>.
- Add the new Property to existing set of properties by using ItemProperties.Add(demoCompanyWithSymbol)
- Then finally return the item back to the Crawler for indexing with new set of properties.
In this case we have initialized the “DemoCompanyWithSymbol” Managed Property with the combination of DemoCompany and DemoCompanySymbol properties as
demoCompanyWithSymbol.Value = string.Format(“Company {0} has a symbol {1}.”, companyProperty.Value.First(), symbolProperty.Value);
Once we are done with the code, hit F5 to run the Custom Content Enrichment Service in Debug Mode, so that we can test the logic and debug the issues if we get any.
As soon as you hit F5 you will get a WCF Test Client Application Launches, on this application page copy the URL of the service as shown below:
Paste it in the Browser to validate if it is running fine.
Ok now when we have got our Custom Content Enrichment Service up and running we can let SharePoint know about this service.
This Service Extension can be registered with SharePoint using PowerShell as shown below:
And in case you need to remove this registration later on you can use the following PowerShell command:
Now once the registration is done, we need to initiate the Full Crawl in order to re-process all the Crawled Items as per the logic written in the Custom Content Enrichment Service.
This is the time when you can put break point in your code and expect it to hit when the Full Crawl sends the first and any subsequent item to Custom Content Enrichment Service for Processing.
At this time you can intercept the code execution to inspect the incoming Items.
Once full crawl is done, execute the Search Query directly in browser to see if the new Property DemoCompanyWithSymbol contains the value provided by our Custom Content Enrichment Service.
We can build the search query shown below:
Execute the Query and analyze the response to see for DemoCompanyWithSymbol property and sure enough we should get the DemoCompanyWithSymbol property updated with new values as shown below:
This implementation could be really effective in cases where we are dealing with Heterogeneous Content Sources or where we are lacking with lesser amount of Metadata information than expected.
Hope this will help someone in need…


