SharePoint 2013: How to Create Custom Result Blocks using Query Rules

In this article we are going to explore SharePoint Search Custom Result Blocks configured using Query Rules.

What are Results Block?

A Result Block is set of filtered results that are combined with core search results and displayed on top of the core search results as a block or can be ranked with in the Core Search Results depending on how you configure it to be.

It is not required to have results for Result Blocks from Local Search index only. A Result Block can use any of the result source from the below list:

  1. Local SharePoint farm
  2. Remote SharePoint farm
  3. OpenSearch
  4. Exchange

In order to setup this demo, I have prepared the system with some test User Profile data as described below:

I have setup three User Profiles with different job titles as shown below:

User 1 : SP\Administrator

1

User 2 : SP\Guest

2

User 3 : SP\SPDeveloper

3

In order to configure Result Block, we need to start it with Query Rules configuration by using the following steps:

Go To Site Settings

4

Under Search, Click Query Rules

5

Choose Result Source as applicable, here I am working on Local SharePoint Search Results

Click on New Query Rule

6

Under General Information, Enter Rule Name

Under Query Conditions,

  1. Select Query Options as needed, here Advanced Query Text Match works for me
  2. Select phrases which you want to be included while matching query text issued by the user

7

Click on Add Result Block

8

Enter Block Title, this title will be added as Header with the Result Block displayed on Search Result Page.

Click on “Launch Query Builder” Button

Select the number of items to be displayed inside the result block from Items Dropdown as shown below, here I will go with 4 items to be displayed inside Result Block.

9

Configure the Query as shown below:

  1. Select a Result Source to as target for the query, here I am using “Local People Results” as I have setup test data in User Profiles.
  2. Choose suitable property to filter on from Property Filter Drop Down
  3. Choose suitable Operator
  4. Choose suitable value type
  5. Choose suitable value as shown below
  6. Click on Add property Filter
  7. This will add the query filter to the Query Text box
  8. Click on the Test Query Button, to validate the query you have just created
  9. Search Result Preview Section will show few of the total search results returned by the query just configured in the previous steps
  10. Click OK to close Query Builder Dialog

10

Always Choose the setting as shown below, if you want to have Result Block Displayed on top of Core Search Results as a separate block.

You can also choose to display “More” Items link, in case you want to show case the complete result set retuned based on the Query Rule. For this to happen you have to have a separate page configured with the same query to show all the results. I am choosing here not to display it.

11

And That’s it.

We are all done with the configuration work for the result block and now it is time to test the results returned based on the configuration we did above.

Final Configuration would look like as shown below:

12

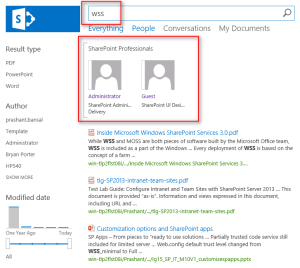
In order to test the scenario, Enter “MOSS” or “sps” or “wss” as Search Term, remember we added “MOSS, sps, wss”in the search phrases while configuring Query Rules.

Since we got the search term “MOSS” or “sps” or “wss” as a Query issued by user, SharePoint Search System identifies a suitable query rule by matching this term with the phrases we specified while configuring Query Rules above and filter out the results based on the query we specified, in this case it was “JobTitle:SharePoint”, which mean finds any Profiles for which Job Title Property contains the word “SharePoint” .

Based on the query treatment as mentioned above we got two profiles “User 1 : SP\Administrator” with Job Title “SharePoint Administrator” and “User 2 : SP\Guest” with Job Title “SharePoint UI Designer”, displayed as valid results inside Results Block.

On the other hand we do not get “User 3 : SP\SPDeveloper” listed in the Result Block as Job Title Property for this profile is blank, due to this “JobTitle:SharePoint” match gets failed and this result get filtered out as shown below.

13

14

15

Hope this will help someone in need…

SharePoint 2013: Export To Excel Using REST API

In this blog post we will discuss how can we export the SharePoint List Data using a custom solution approach utilizing SharePoint REST API.

Though this feature is also available OOB through SharePoint List/Libraries Ribbon Control, but limited under the scenarios mentioned below.

This solution can be utilized to overcome the OOB limitations under following scenarios:

  1. When we need to trigger export process on a custom events
  2. When we need to export filtered set of data at runtime
  3. When we need to automate the export process by specifying batch size on the fly

In order to demonstrate the solution I have setup the environment as below:

  1. Create a Large List with 10,000 Items
  2. Create a new WebPart Page with Content Editor WebPart added to it with a text file referenced from Site Assets Library. This page will take care of Presentation part of the solution, which is quite simple in this case.
  3. Add a Text File to Site Assets Library to which we will add the necessary code to achieve this solution.

Once the list is created and items are added to it, it will look like as below.

1

Please note that I intentionally keep the number of items more than the list default threshold limits (5000 items) in order to make sure that this solution remains workable even if the list threshold has been crossed.

Also notice that we only have one View (All Items) which is created already OOB as shown below:

2

Now first of all we need to analyze the super simple UI that we have created using WebPart Page.

This UI has got one Button “Create & Export List View”.

3

Now let’s look for the HTML that builds this super simple UI.

  1. “viewTitle” Div: Will display the title that we want to show while rendering the List View on this Page.
  2. “printView” Div: Will display the List View which will render as HTML
  3. “Create & Export List View” Button: Will Trigger the following actions:
    1. Create a new View in SharePoint List
    2. Export View Data to Excel Sheet
    3. Render View as HTML on the Custom UI

4

Next thing is to talk about the core plumbing that will do all the magic.

We need to add the JQuery reference to our JS File as shown below:

5

In our JS Code we will be having two functions:

CreateViews: This function will create a new view based on the filter query and row limits.

Let’s analyze the code for this function to understand the different sections as shown below:

  1. Request Headers: Specify the needed Request Headers for the REST Call.
  2. View Name: Generate Dynamic View Name
  3. URL: Prepare URL for REST Call to query the List Views
  4. REST Call Body To Created New View in SharePoint List:
    1. Specify Metadata used to create the SPView
    2. Specify View Name
    3. Specify if this is Personal View
    4. Specify the ViewQuery to get the filtered records in the View
    5. Specify the RowLimit to specify the maximum number of records that a view can hold. (I have specified 10,000)
    6. Call Success: Execute another method to Export and Render the List as HTML

6

We got another function “getViewAsHTML“ which will be executed if the above call gets successful.

In this function we got two noteworthy things:

  1. Calling renderAsHTML() Function : This function will take care the rendering of List Views as HTML.
  2. Export URL: This is a bit of tricky to get prepared the Export URL but fortunately with a very simple solution as explained below-

7

The simple solution to this tricky problem is to issue a dummy request to SharePoint to export the list data using following steps:

  1. Launch Fiddler
  2. Navigate to SharePoint List
  3. Click on Export to Excel Ribbon Command Button
  4. Analyze the request intercepted by Fiddler

8

9

Copy the URL issued to SharePoint by Command Button and analyze it.

10

On analysis we found that we can build this URL dynamically by providing List ID and View ID at runtime and that’s exactly what we are doing in the step 2 of getViewAsHTML() function above:

11

And that’s it.

We are all done with the functionality, now it is the time to test all our hard work.

Now launch the WebPart Page with our UI present on it.

Click “Create & Export List View” button

12

And sure enough once the execution is completed we will see three actions occur as follows:

  1. A new View has been created in the list as shown below:

13

  1. List View gets Render as HTML in “printView” Div as we discussed above
  2. Export Query File is ready to be downloaded

14

Save the Query File

15

Open the Query File and Enable the Data Connection with SharePoint

16

And we will get all items hold by the view based on the query specified, in this current View I took all 10,000 items as shown below:

17

18

Though this is quite a simple approach which can be used to easily cater the custom data export requirements in SharePoint.

Code Snippet:

/sites/dev01/Shared%20Documents/jquery-1.7.1.min.js


function getViewAsHtml(viewId, viewTitle)
 {

var headers = {
 Accept: "application/json;odata=verbose",
 "Content-Type": "application/json;odata=verbose",
 "X-RequestDigest": jQuery("#__REQUESTDIGEST").val()
 };

var call = jQuery.ajax({
 url: _spPageContextInfo.webAbsoluteUrl
 + "/_api/Web/Lists/getbytitle('TestList')/Views('"+viewId+"')/renderAsHtml()",
 type: "GET",
 data: "json",
 headers: headers
 });

call.done(function(data, textStatus, jqXHR)
 {
 $('#viewTitle').html("

"+viewTitle +"

"); $('#printView').html(data.d.RenderAsHtml); window.location=_spPageContextInfo.webAbsoluteUrl + "/_vti_bin/owssvr.dll?CS=65001&Using=_layouts/15/query.iqy&List=%7B00361C78%2D4158%2D4A9B%2DA12D%2D8C55DE4E9079%7D&View=%7B"+viewId +"%7D&RootFolder=%2Fsites%2Fdev01%2FLists%2FTestList&CacheControl=1"; }); call.fail(failHandler); function failHandler(jqXHR, textStatus, errorThrown) { var response = JSON.parse(jqXHR.responseText); var message = response ? response.error.message.value : textStatus; alert("Call failed. Error : " + message); } } function createViews() { var headers = { Accept: "application/json;odata=verbose", "Content-Type": "application/json;odata=verbose", "X-RequestDigest": jQuery("#__REQUESTDIGEST").val() }; var viewName = "By Status" + Math.floor((Math.random() * 100) + 1); var call = jQuery.ajax({ url: _spPageContextInfo.webAbsoluteUrl + "/_api/Web/Lists/getbytitle('TestList')/Views", type: "POST", data: JSON.stringify({ "__metadata": { type: "SP.View" }, Title: viewName, 'PersonalView': false, 'ViewQuery':'', 'RowLimit': 3 }), headers: headers }); call.done(function(data, textStatus, jqXHR) { getViewAsHtml(data.d.Id, data.d.Title); }); call.fail(failHandler); function failHandler(jqXHR, textStatus, errorThrown) { var response = JSON.parse(jqXHR.responseText); var message = response ? response.error.message.value : textStatus; alert("Call failed. Error : " + message); } } $(document).ready(function() { //getViewAsHtml(); });
<br/> <br/> <br/>


Hope this will help someone in need…

SharePoint 2013 : Promoted Search Results

In this post we will explore another cool SharePoint Search Feature commonly known as “Promoted Results”.

Before diving deep into implementation details, let’s have some background on this new cool feature of SharePoint 2013 Search.

What are Promoted Results?

Since the SharePoint 2013 Search System is built up from scratch by absorbing all great features from its predecessors, one of such features is known as “Best Bets” in SharePoint 2010 Enterprise Search, “Visual Best Bets” if we are using Fast Search and now “Promoted Results” in SharePoint 2013 Search Environment.

Promoted Results are triggered by one or the other conditions specified while defining the Promoted Results as we will see next in this post.

In order to define the Promoted Results we will proceed as follows:

Go to “Site Settings -> Query Rules” as shown below:

1

2

On Manage Query Rules Page, Select the appropriate Result Source suited to your needs, then click “New Query Rule” Link as shown below:

3

On the “Add Query Rule” Page

  1. Specify the Rule Name
  2. Specify Query Conditions

Please note the Keyword “SharePoint” that we specified in the below configuration, this will ensure that whenever Search Query contains the Keyword “SharePoint” this Promotion will be served as a part of the search results retuned as a response to this query.

4

Then click on “Add Promoted Results” Link

5

On the “Add Promoted Result” Page,

  1. Specify the Title : Any Valid Title
  2. Specify the URL: Any valid URL of the .aspx Page with valid HTML inside it.

Check the “Render the URL as banner instead of as a hyperlink” checkbox, this will ensure that Promotional Content will be displayed in HTML View instead as a hyperlink.
Click Save to save the changes.

6

Under the “Publishing” Section,

  1. Select “Is Active” Checkbox to enable this Timeline Driven Promotion.
  2. Specify “Start Date” & “End Date” to specify the Timelines for this Promotion to be visible on top of the search results.

7

And that’s it with the Configuration of New “Promoted Result”.

Final configurations would look like as shown below:

8

Now it is the time to Test the “Promoted Result”.

Visit Global Search Center Site and specify the Keyword “SharePoint” as query as shown below.

And sure enough we will get the Promotional Result at the very top of the search results.

9

So we can see how easy is to implement Promoted Results in SharePoint 2013.

Hope this will help someone in need…