SHAREPOINT MIGRATION – EXPORT Alternate Access Mapping

This is article is next in the series of articles on “SharePoint Migration & Planning” Strategies. You can reach out to the previous articles in this series using the following links:

  1. SHAREPOINT MIGRATION: PLANNING & GUIDANCE ON SHAREPOINT OBJECTS
  2. SHAREPOINT MIGRATION – EXPORT IIS SETTINGS

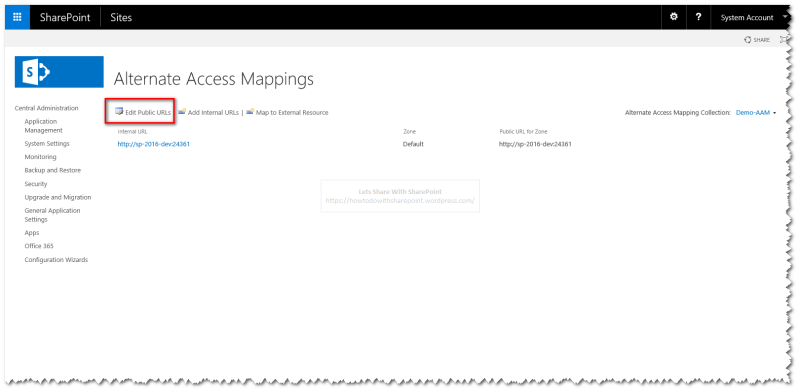
In this article we will look for the PowerShell Scripts to export “Alternate Access Mapping (AAMs)” Settings from source SharePoint Farm. This information will be helpful to track all the “AAMs” defined in SharePoint Farm.

In Step 1 we will add the PowerShell Snapin to PowerShell Script as usual

1

In Step 2 we define a function and initiate the export CSV file with Column Headers. For this demo I am exporting a few important properties like “Incoming Url, Zone, Public Url” but you may query all possible properties as you deemed fit

In Step 3 we execute the “Get-SPAlternateURL” cmdlet to query the required properties

In Step 4 we loop through the properties collection for all AAM Mapping and list out the queried properties for each mapping

In Step 5 we add the content of properties for each of the AAM Mapping to the CSV file

2

In Step 6 we will set the settings file path and call the function to export the AAM Mappings

3

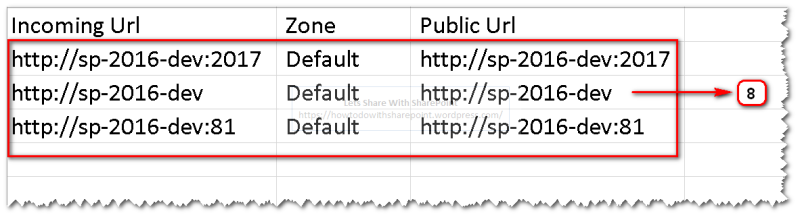
Once this script get executed successfully, it will export the AAM Mappings in a CSV File as shown below in Step 7

4

We can see the exported mappings as shown below in Step 8

5

Code Reference:

Add-PSSnapin "Microsoft.SharePoint.PowerShell"Add-PSSnapin "Microsoft.SharePoint.PowerShell"
function Get-Alternate-Access-URLs(){ Try {        if (Test-Path $settingsFilePath)        {            Remove-Item $settingsFilePath        }
        Add-Content $settingsFilePath "Incoming Url, Zone, Public Url"
        $aamSettings = Get-SPAlternateURL | Select IncomingUrl,Zone,PublicUrl
        foreach ($aamSetting in $aamSettings)        {            $incomingUrl = $aamSetting.IncomingUrl            $zone = $aamSetting.Zone            $publicUrl = $aamSetting.PublicUrl
            $settings = "$incomingUrl, $zone, $publicUrl"             Add-content $settingsFilePath $settings        }    }    Catch {         Write-Host $Error -ForegroundColor Yellow }}
Clear-Host
$settingsFilePath = "C:\Prashant\PowerShell\SharePoint Migration\PowerShell - Get-Alternate-Access-URLs\Alternate-Access-Urls.csv"
Get-Alternate-Access-URLs

That is all for this demo.

Hope you find it helpful.

SharePoint 2016: How To Implement Alternate Access Mapping

In this article we will discuss implementing “Alternate Access Mapping” or commonly known as “AAM” in SharePoint 2016.

Alternate Access Mapping Architecture

If you are not aware of AAM or you have some misconceptions about it, I would highly recommend you to read through an excellent blog Alternate Access Mappings (AAMs) *Explained by “Brain Pendergrass” from Microsoft and would like to thank him for such an awesome blog to make me understand this concept in depth.

This article will focus on guided steps to configure AAM in SharePoint 2016 and we won’t discuss AAM as a concept.

Create New Web Application

Step 1: To start the demo let go to SharePoint Central Admin Site and click on “Manage Web Applications” as shown below-

1

I am creating a new Web Application for demo purpose. In real environments we can use any existing Web Application to perform these steps.

Step 2: Click “New” menu to launch “Create New Web Application” wizard

2

Step 3: Enter Web Application Name and other necessary information

3

Once done click OK to start the process

4.0

When the creation process has been completed then we can see a new Web Application listed in the list of Web Applications

4.1

Also we may see the Modal Dialog that offers quick link to create new Site Collection for this Web Application

4.2

Create New Site Collection

Step 4: Click on “Create Site Collection” link to create new Site Collection for the Web Application.

Select Web Application

5

Enter Title, URLs, Template, Primary Site Collection Administrator

6

Click “OK” to start the process

7

Once process has been completed we can see new Site Collection created for the Web Application

9

We can navigate to the site collection by clicking the URL

10

Add DNS Entries

Step 5:  Now we have configure add host entries to DNS.

Search for DNS

11

Add new Host Entry to the “Forward Lookup Zone” as shown below-

12

In New Host screen, enter Host Name, Select FQDN, enter IP Address. Once done click “Add Host”

13

If operation completed successfully we can see popup window show success message

14

We can see this new Host added to the existing list

15

Add/Update IIS Bindings

Step 6: Add “IIS” Bindings

Now we have to add IIS bindings for the new Host. Search for “IIS” and select “Internet Information Services (IIS) Manager”

16

Select the Web Application that we have created in above steps from the “Connections” Panel on the left under “Sites” node

Click on “Bindings…” on the right to Add/Edit Web Application Bindings

17

In the “Site Bindings” screen select the default binding and click “Edit”

18

In the “Edit Site Binding” screen enter Host Name value and this should match the entry that we have created earlier in DNS

Click OK

19

Once saved the existing binding will look like as shown below-

20

Configure Alternate Access Mappings Using Central Admin

Step 7: Configure Alternate Access Mappings (From Central Admin)

Go To Central Admin -> “Application Management”

Under Web Applications Click “Configure alternate access mappings”

21

Click “Edit Public URLs”

22

In the “Edit Public Zone URLs” Screen and enter “Default Zone” URL with “Host Name” configured earlier as shown below.

Click “Save” once you entered the default Zone URL to save the data.

23

Now try accessing SharePoint Web Application using Public Zone URL and if the configuration goes well, the access will be granted to you

Test Alternate Access Mappings

2425

Configure Another Mapping

Step 8: Repeat Step 5 to add another DNS entry to add a new Host Name

262728

Step 9: Repeat Step 6 to Add Web Application Bindings

2930313233

Configure Alternate Access Mappings Using PowerShell

Step 10: Configure Alternate Access Mappings (Using PowerShell)

Now we will add this new Host Name to the default zone for the web application

Launch SharePoint 2016 Management Shell

34

“New-SPAlternateURL” cmdlet gives us option to add new Alternate URLs to the required zone for web application

This cmdlet take following parameters

  • New Alternate URL – URL that you need to register as alternate URL
  • Web Application Path – URL that represent Web Application
  • Zone – Represents a zone that you need this alternate URL to add to

35.0

Once this command executes successfully we can a new Alternate Access Mapping added to the list

35.1

Test Alternate Access Mapping

Now if try to access this web application using this new mapping it still be translated to the same Public URL for the Web Application.

3637

By following above steps we can enable a web application that receives the request from an internal URL in one of the five authenticated zones to return pages that contain links to the public URL for the zone

Hope you find it helpful.