SharePoint 2016 Administration : Configure Managed Paths using PowerShell

Managed Paths in SharePoint are used to specify the paths in the URL namespace of Web Applications to be shared by the Site Collections hosting by the Web Application.

We have got two kinds of Managed Paths that can be created with in SharePoint namely Wildcard and Explicit.

Explicit Managed Paths

Explicit Managed Paths may be used when we are not planning to create Site Collections under a specific Managed Path. We will see the creation of the Explicit Managed Path in this article and it would be like

http://sp-2016-dev/prashant-explicit

In this case we cannot have more one site collection pointing to this URL.

Wildcard Managed Paths

Wildcard Managed Paths may be used when we are planning to create Sites or Sub Sites under a specific Managed Path. We will see the creation of the Wildcard Managed Path in this article and it would be like

http://sp-2016-dev/prashant-wildcard/

In this case we can have more one site collection pointing to the managed path specified by this URL

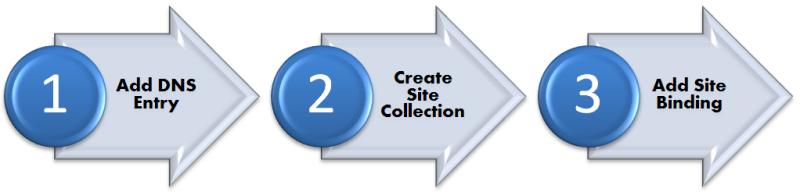
In this article we will be walking through the steps and PowerShell Scripts involved in creating Managed Paths in SharePoint 2016

  • Launch Central Administration Site
  • Choose “Manage Web Applications”

1

  • Select the Web Application in context of which you want to create the Managed Paths
  • Choose “Manage Paths” Ribbon Control

2

We can see the UI for “Define Managed Paths” screen in the Modal Dialog and this is the place where we can add required managed paths for our Web Application.

3

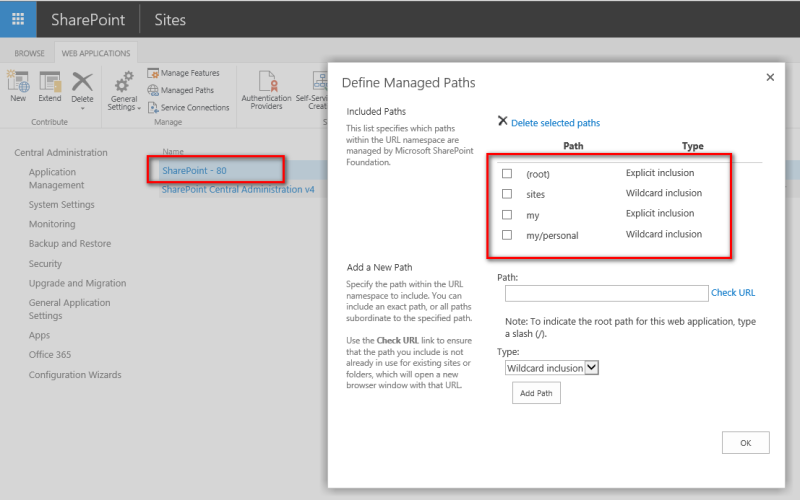
But since this article is about automating the SharePoint Processes so we will see how to do it using PowerShell in the following sections-

PowerShell Command

Wildcard Managed Paths

  • Launch SharePoint 2016 Management Shell
  • Run the following PowerShell Command to add a Wildcard Managed Path
New-SPManagedPath "Prashant-Wildcard" -WebApplication http://sp-2016-dev

4

We can go back to “Define Managed Path” screen to verify if the new Managed Path has been added for the specific Web Application

5

Explicit Managed Paths

  • Launch SharePoint 2016 Management Shell
  • Run the following PowerShell Command to add a Wildcard Managed Path
New-SPManagedPath "Prashant-Explicit" -WebApplication "http://sp-2016-dev" –Explicit

6

We can go back to “Define Managed Path” screen to verify if the new Managed Path has been added for the specific Web Application

7

Now finally we can verify the availability of the new created Managed Paths to the Site Collections created under the roof of Web Application http://sp-2016-dev

  • Go to Application Management
  • Choose “Create Site Collections”

8

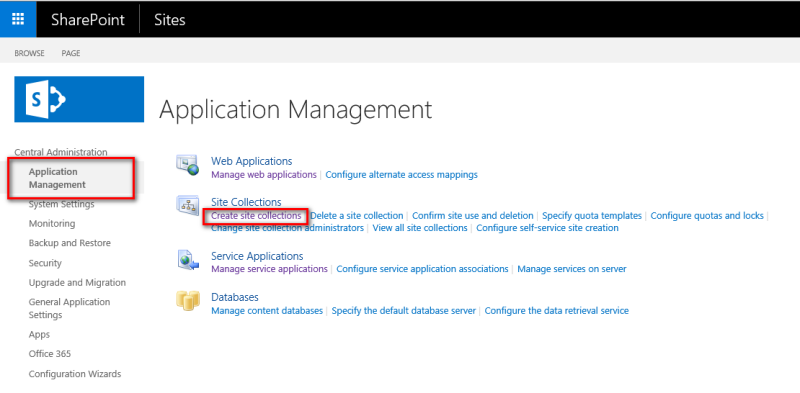
On the “Create Site Collection” screen under “Web Site Address” section we can see the newly created Managed Paths both Wildcard and Explicit type

9

That is all for this demo.

Hope you find it helpful.

SharePoint 2016 Administration : How to configure SharePoint Designer Settings using PowerShell

SharePoint Designer being a very powerful tool can be used to perform many operations inside SharePoint Environment, creating Workflows, External Content Types, Master Pages & Page Layouts Branding are to name a few of them.

Since Microsoft already announced that there will be no new version of SharePoint Designer to be released for SharePoint 2016 and the existing SharePoint Designer would be fully functional with it so it even becomes more important to understand the governance around this excellent tool.

Being a tool with reputation to perform so many actions it is utmost important to work around proper governance plan per Web Application basis to control this little beast.

In this article we will be going to walk through the steps and PowerShell Scripts involved in configuring the SharePoint Designer settings.

Before we start configuring the settings for SPD lets’ see what will happen if these settings are not enabled on Web Application Level

Search for SharePoint Designer and Launch it

1

Now try opening any Site using SharePoint Designer and boom

Got an error: Access Denied!

2

This is due to the fact that SPD usage permission has been revoked already we would be looking an obvious SharePoint Error saying access denied even if the user has full access the Site itself. This is because of the fact that SharePoint manages permissions for SPD and Sites separately.

Now in order to enable permissions for SPD we can go along with the following steps-

  • Launch Central Administration Site
  • Click on “General Application Settings”

3

  • Click on “Configure SharePoint Designer Settings” Link under SharePoint Designer Section

4

Select Web Application for which you want enable SharePoint Designer Settings

And in the screenshot below we can see there are four properties that need to be configured to get SPD up and running.

5Since we are looking for automating SharePoint Configurations using PowerShell so we will configure it by PowerShell way only.

Since this article is about implementing automation for SharePoint configurations using PowerShell, so we will go along with PowerShell only.

PowerShell Commands

  • Get Web Application Object that you want to enabled with SPD usage

$webAppObj = Get-SPWebApplication -Identity http://sp-2016-dev

  • Set AllowDesigner, AllowRevertFromTemplate, AllowMasterPageEditing, ShowURLStructure properties to “true” if you want all SPD features enabled for the Web Application

6

$webAppObj.AllowDesigner = $true

$webAppObj.AllowRevertFromTemplate = $true

$webAppObj.AllowMasterPageEditing = $true

$webAppObj.ShowURLStructure = $true

  • After setting the required properties don’t forget to call Web Application Update Method to save the changes back to database.

 $webAppObj.Update()

Execution

  • Launch SharePoint 2016 Management Shell
  • Run the above commands

7

Once the commands get executed we can go back to “SharePoint Designer Settings” Page to verify the changes to the properties persist.

8Now try connecting to the Site again

9

And since the permissions has been enabled to the Web Application for SPD Access you can be able to connect to the site with the Web Application as shown in the screen shots below-

10

11

That is all for this demo.

Hope you find it helpful.

SharePoint 2016/2013 Administration : How to Create Host Header Site Collections

A host-named site collection allows you to address a site collection with a unique DNS name, such as http://site001.prashant.com.

SharePoint decides the mapping of the Host Name with the Site Collection at the time of initializing SPSite Object. During the initialization Process SharePoint queries the SPWebApplication object to see if Host Header details are associated with the Site Collection and if there is no information returned on Host Headers then it becomes evident that this is a typical site collection.

If we inspect the ULS logs for Site Collections with Host Headers, we will see the entries like Site lookup found the host header site http://site001.prashant.com/Pages/default.aspx on the other hand if we inspect the same logs for Site Collections without Host Headers Looking up the additional information about the typical site http://serverName:Port/sites/site001

In this article we will look into the steps to create Host Header based Site Collections as per the following process –

1

Step 1: Add DNS Entry

  • Search for DNS on Windows Server

2

  • Select the Domain Name
  • Right Click and Select “New Host”

3

  • Enter new Host Name
  • Enter IP Address of the Hosting Server
  • Click Add Host

4

This will add a new Host Name entry in the DNS Catalog

5

 Step 2: Create Site Collection

Since we don’t have Web UI available to create the Host Header based Site Collections so the only option we are left with PowerShell only.

Following is the PowerShell command that we can use to create a Host Header based Site Collection-

New-SPSite “http://developerWorkspace001.PRASHANT.LOCAL” -HostHeaderWebApplication “http://developmentportal.prashant.local:2016” -Name “Developers Workspace 001” -OwnerAlias “Prashant\Administrator” -Template “DEV#0”

In this command we have the following parameters and their values:

1.1.png

Once you execute the PowerShell we can see the following output

6

We can verify the creation of the new Host Header Site Collection by going to

Central Administrator -> Application Management -> View All Site Collections

7


Step 3: Add Site Binding

Following is the PowerShell command that we can use to Add the Site Binding in IIS-

New-WebBinding -Name “Development – Portal” -IPAddress “*” -Port 2016 -HostHeader “developerWorkspace001.PRASHANT.LOCAL”

In this command we have the following parameters and their values:

2.1

Once the PowerShell executed successfully we can see the following output on the command prompt

8

We can verify the creation of Site Binding in the IIS by using following steps:

  • Search for IIS on Windows Server

9

  • Select the Web Application and click on Bindings Links as shown below

10

  • On the Site Bindings Window we can see a new Site Binding Added to the IIS

11

  • Select the Site Binding and Click Edit button to open Edit Site Binding window

12

This shows that Binding is created successfully.

Now lets’ visit the Host Header Site Collection by visiting the following URL:

http://developerWorkspace001.PRASHANT.LOCAL


Enter the credential when asked for

13


And there we are

14


That is all for this demo.

Hope you find helpful.

SharePoint 2016/2013 Administration : How to Create Host Header Web Applications

When we deal with Web Application URLs in SharePoint Environment it is quite important to review the URL Structure. By default when we create any SharePoint Web Application, it takes server name as default while preparing the URL structure as follows-

http:// <Server Name>:<Port>

Using Host Header we can overwrite this default behavior of comprising Web Application URL by SharePoint Engine.

In this article we will look for the Steps to create Web Applications with Host Headers.

If we look for the Web Application List created we can see only two Web Applications created as shown in the figure below:

1

If we closely look for Web Application SharePoint -80 which has been created with defaults and that is why if you see to the URL you will notice the URL structure is http:// <Server Name>:<Port>

Now in order to create the Host Header based Web Applications we need to follow the below steps:

2

Add DNS Entry for Host Header

  •  Search for DNS on Windows Server

3

  • Right Click on the Domain Name
  • Choose New Host

4

  • Specify the Name Host Header
  • Specify IP address to the Server
  • Click Add Host Button

5

6

Create Web Application Using PowerShell

As we know that default Authentication Mode for a Web Application is Classic when it is created using PowerShell. But here we have to create a Web Application in Claims Based Authentication Mode and that is why it is necessary to initialize the authentication provider by calling New-SPAuthenticationProvider command which return a fresh object referring Claims Based Authentication

$authenticationProvider = New-SPAuthenticationProvider

Then we need to call for New-SPWebApplication command to create a new Web Application utilizing Host Header as below-

New-SPWebApplication -Name “Development – Portal”  -Port 2016 -HostHeader “developmentportal.PRASHANT.LOCAL”  -URL “http://developmentportal.PRASHANT.LOCAL&#8221;  -ApplicationPool “SharePoint – 2016” -ApplicationPoolAccount (Get-SPManagedAccount “Prashant\Administrator”)  -AuthenticationProvider  $authenticationProvider

9

Once we get this PowerShell command executed using SharePoint Management Shell successfully, we can see the details of the new Web Application created just now

7

Similarly we can go back to Central Administration to look for List of Web Applications and can be able to locate this newly created Web Application

It is important to note the URL of the newly created Web Application and see the Host Header is now present in the Web Application URL Structure as needed.

8

And we are done!!

Hope you find it helpful.