SharePoint Developer Tools: How To Test & Debug SharePoint REST API Endpoints (POST Requests)

This is the second are article in the series of using Fiddler as Debugging & Testing Tool for SharePoint REST API EndPoints.

You can read the article on GET Request here:

SHAREPOINT DEVELOPER TOOLS: HOW TO TEST & DEBUG SHAREPOINT REST API ENDPOINTS (GET REQUESTS)

POST requests are different in nature than GET requests. They require more authentication layers to get through in order to push the data to SharePoint Lists and Libraries.

In order to run the POST request successfully we need an additional request header “X-RequestDigest” which is not but the User Authentication Token.

In order to request this token from SharePoint we need to make of “contextInfo” endpoint that will return the “FormDigestValue” containing the required user authentication token.

Now let see how we can request Authentication Token from SharePoint

Get Authorization Token

http://<Host Name>_api/contextinfo

1

2

Once we get the Authentication Token from SharePoint, we can add this token information in the Request Header of each of the POST requests

Request Headers

Accept: application/json;odata=verbose
Content-Type: application/json;odata=verbose
X-RequestDigest: 0xE1AE266A42214DA2940689826F68426D10620220CEDD3093CA2C234993E4ECA265BA57D357E8D3BD32F56660613CADBF72495F2C858B38F7C9B9C3CAD797F6D5,06 Feb 2017 01:22:08 -0000

Once we are ready with Request Headers we can start issuing POST Requests as shown below-

Add Data to List

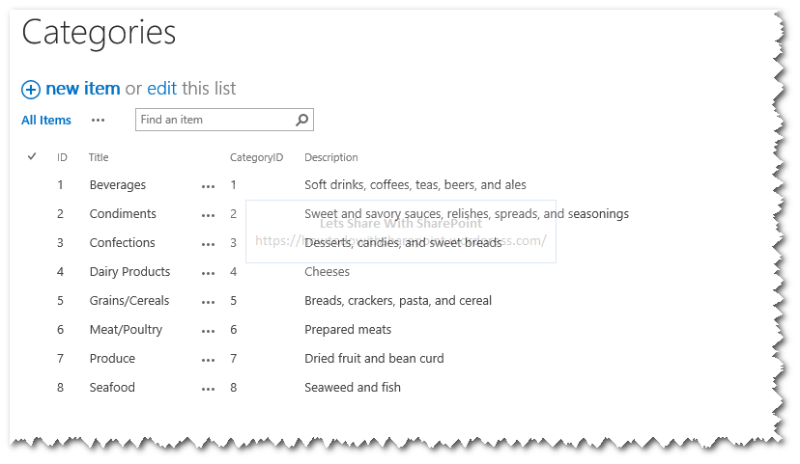
Let’s consider we have a list called Categories as shown below-

3

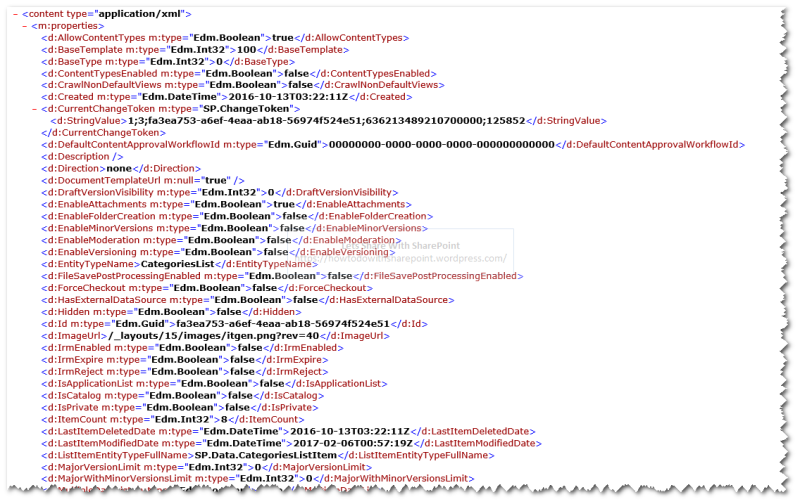
First see the XML return based on querying schema for Categories List using following URL

http://<Host Name>/_api/Web/Lists/getByTitle('Categories')

4

Then we will see the XML return based on querying for Categories List Items using following URL

http://<Host Name>/_api/Web/Lists/getByTitle('Categories')/Items

5

Next step is to prepare the Request Body and we have to include following properties to add the items.

Please note that I am taking properties that are required for this list to add the category and add any desired number of properties to the Request Body as per the schema of the target list.

Request Body

"__metadata": { type: " SP.Data.CategoriesListItem" },
Title: "Category From Fiddler",
CategoryID: 9,
Description: “New Category Added from Fiddler”

6

Once we execute this request we can inspect the response to ensure that the request item has been added successfully to the Categories List.

7

Also we can validate this new item added by browsing Categories List

8

Update List Item

http://<Host Name>/_api/Web/Lists/getByTitle('Categories')/Items(9)

For update request you have to include “eTag” value that was returned with the item during the initial query to the Request Body. SharePoint uses this value to determine if there is any updates made to the item since it is last queried.

“If-Match: *” can be used to match any “eTag” value resulting in the operation being performed regardless of the actual value.

“X-Http-Method: PATCH” is to override the existing values

So the request body would be like this

IF-MATCH: *
X-Http-Method: PATCH
{
    "__metadata": {
    type: "SP.Data.CategoriesListItem"
},
Title: "Category From Fiddler - Updated",
Description: "New Category Added from Fiddler - Updated"
};

9

Once the request executed successfully we can see the item is updated in the Categories List

10

Delete List Item

http://<Host Name>/_api/Web/Lists/getByTitle('Categories')/Items(9)

Delete operation is more or less similar to Update operations.

11

In case of delete we will use of “X-Http-Method: DELETE” in the Request Body

Request Body

IF-MATCH: *
X-Http-Method: DELETE

12

Once the request executed successfully we can validate the item is deleted from the list.

13

Add New List

http://<Host Name>/_api/Web/Lists

Adding a new SharePoint List involve a little bit more of configuration information in Request body apart from request headers

Request Headers

Accept: application/json;odata=verbose
Content-Type: application/json;odata=verbose

Request Body

Content-Length: 0
{
"__metadata": { type: "SP.List" },
"AllowContentTypes":true,
"ContentTypesEnabled":true,
"Description":"This is Task List Created using Fiddler",
"BaseTemplate": 107,
"Title": "Task List By Fiddler"
}

14

Once this request has been executed successfully we can see the Response Body holding information about newly added SharePoint List

15

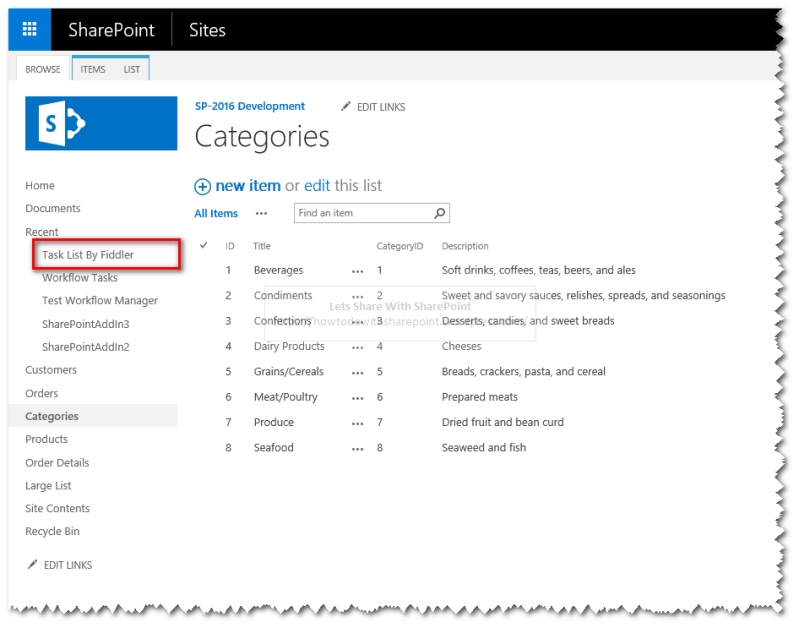
Also we can see this new list added to SharePoint by browsing the respective site

16

17

Also we can verify the “AllowContentTypes” & “ContentTypesEnabled” properties are configured as expected by browsing the Advanced Properties of the new List as shown below-

18

Delete List

http://<Host Name>/_api/Web/Lists/getByTitle('Task%20List%20By%20Fiddler')

Deleting a list is rather simpler than adding it. It takes “X-Http-Method: DELETE” to be added to the request header and rest will be done for you.

 Request Headers

Accept: application/json;odata=verbose
Content-Type: application/json;odata=verbose
Content-Length: 0
IF-MATCH: *
X-Http-Method: DELETE

19

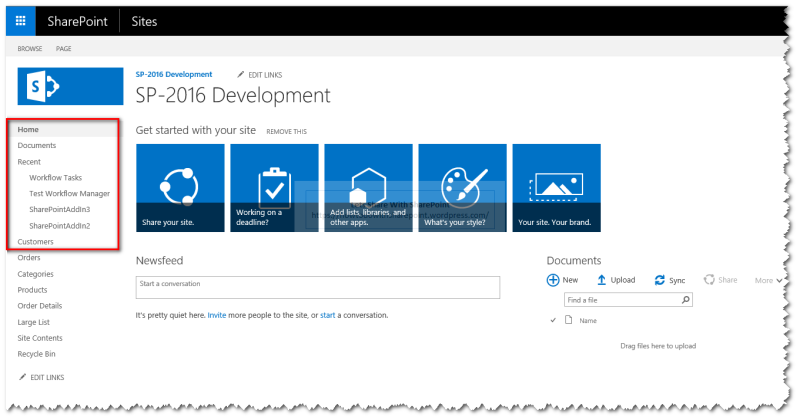
Once the request has been completed, it will delete the required list from SharePoint Lists Collection.

20

Hope you find it helpful.

SharePoint 2013 : How to overcome List Threshold Limits using OData Continuation

While working with SharePoint Large List we all must have encountered the issues with restricted access to the list due to List Threshold Limits.

In this article we see the solution to this problem that can be implemented using OData Continuation in conjunction with REST API.

In order to demonstrate this solution I am making use of SharePoint Hosted App as in shown in below steps-

  • Create SharePoint App Project by choosing “App for SharePoint 2013” Project Template

1

  • Specify Host Web URL
  • Select SharePoint -Hosted as hosting model

2

Wait while Visual Studio configure the Project for you

3

In order to showcase the data access from a Large SharePoint List, I have added a list with 1 Lakh items in it and default Threshold limits are still intact

4

Now add some HTML for the UI in the Start Page of the App (default.aspx)

Step 1: Adding container for the HTML Button

Step 2: Adding HTML Button that will execute the code in action

5

So the final UI would look like as below-

6.1

Now add some JavaScript code in App.js File

Step 3: Bind the event handler with the HTML Button in “document.ready()” function

Step 4: Adding a helper function “getQueryStringParameter()” that will help us to extract the Query String Parameters

6

In the Callback function “oDataContinuations” we have following steps executing-

Step 5: Getting value of “SPHostUrl” by using “getQueryStringParameter()” helper function

Step 6: Getting value of “SPAppWebUrl” by using “getQueryStringParameter()” helper function

Step 7: Loading “SP.RequestExecutor.js ” JavaScript file as we need to issue a Cross Domain Call from SharePoint App to Host Web

Step 8: Prepare the URL to execute the Cross Domain Call to the Large List present in the Host Web

Step 9: Instantiate the object of Request Executor based on the App URL

Step 10: Calling “executeAsync” method of Request Executor Object

This function needs a JSON object with configuration values like

url: Specify the Url to execute Cross Domain Call

method: Specify the Request access method (GET or POST)

datatype: Specify the expected return type of the response (JSON)

headers: Specify the Request Headers

Step 11: On successful execution of this request, response object would return back with a property “__next” which contains the direct URL to the next set of records which can be queried from the list, check for this property and make sure it exists before proceed further

7.1

Step 12: Get the Url to the next result set

Step 13: Call the “getItems()” method recursively with the new Url returned by response object “__next” property

7

With this we are all done with the code.

But before we move any further we need to allow the permission for the App on Host Web since we need to query the data from the list which is hanging inside the Host Web.

Step 1: Go to App Manifest File => Permission Tab

Step 2: Specify Read permission

8

Build the Solution and Deploy it

9

Trust the App when asked for

10

Provide the credentials when asked for

11

Click on “Manage Threshold Limits”

12

See to the Result Panel and sure enough you will find records adding continuously based on the Paginated REST Calls driven by Odata Continuation

13

This is a simple demonstration to showcase how we can effectively make use of Paginated REST Calls driven by Odata Continuation to overcome issues related to List Threshold Limits.

Hope you find it helpful.

SharePoint 2013: Export To Excel Using REST API

In this blog post we will discuss how can we export the SharePoint List Data using a custom solution approach utilizing SharePoint REST API.

Though this feature is also available OOB through SharePoint List/Libraries Ribbon Control, but limited under the scenarios mentioned below.

This solution can be utilized to overcome the OOB limitations under following scenarios:

  1. When we need to trigger export process on a custom events
  2. When we need to export filtered set of data at runtime
  3. When we need to automate the export process by specifying batch size on the fly

In order to demonstrate the solution I have setup the environment as below:

  1. Create a Large List with 10,000 Items
  2. Create a new WebPart Page with Content Editor WebPart added to it with a text file referenced from Site Assets Library. This page will take care of Presentation part of the solution, which is quite simple in this case.
  3. Add a Text File to Site Assets Library to which we will add the necessary code to achieve this solution.

Once the list is created and items are added to it, it will look like as below.

1

Please note that I intentionally keep the number of items more than the list default threshold limits (5000 items) in order to make sure that this solution remains workable even if the list threshold has been crossed.

Also notice that we only have one View (All Items) which is created already OOB as shown below:

2

Now first of all we need to analyze the super simple UI that we have created using WebPart Page.

This UI has got one Button “Create & Export List View”.

3

Now let’s look for the HTML that builds this super simple UI.

  1. “viewTitle” Div: Will display the title that we want to show while rendering the List View on this Page.
  2. “printView” Div: Will display the List View which will render as HTML
  3. “Create & Export List View” Button: Will Trigger the following actions:
    1. Create a new View in SharePoint List
    2. Export View Data to Excel Sheet
    3. Render View as HTML on the Custom UI

4

Next thing is to talk about the core plumbing that will do all the magic.

We need to add the JQuery reference to our JS File as shown below:

5

In our JS Code we will be having two functions:

CreateViews: This function will create a new view based on the filter query and row limits.

Let’s analyze the code for this function to understand the different sections as shown below:

  1. Request Headers: Specify the needed Request Headers for the REST Call.
  2. View Name: Generate Dynamic View Name
  3. URL: Prepare URL for REST Call to query the List Views
  4. REST Call Body To Created New View in SharePoint List:
    1. Specify Metadata used to create the SPView
    2. Specify View Name
    3. Specify if this is Personal View
    4. Specify the ViewQuery to get the filtered records in the View
    5. Specify the RowLimit to specify the maximum number of records that a view can hold. (I have specified 10,000)
    6. Call Success: Execute another method to Export and Render the List as HTML

6

We got another function “getViewAsHTML“ which will be executed if the above call gets successful.

In this function we got two noteworthy things:

  1. Calling renderAsHTML() Function : This function will take care the rendering of List Views as HTML.
  2. Export URL: This is a bit of tricky to get prepared the Export URL but fortunately with a very simple solution as explained below-

7

The simple solution to this tricky problem is to issue a dummy request to SharePoint to export the list data using following steps:

  1. Launch Fiddler
  2. Navigate to SharePoint List
  3. Click on Export to Excel Ribbon Command Button
  4. Analyze the request intercepted by Fiddler

8

9

Copy the URL issued to SharePoint by Command Button and analyze it.

10

On analysis we found that we can build this URL dynamically by providing List ID and View ID at runtime and that’s exactly what we are doing in the step 2 of getViewAsHTML() function above:

11

And that’s it.

We are all done with the functionality, now it is the time to test all our hard work.

Now launch the WebPart Page with our UI present on it.

Click “Create & Export List View” button

12

And sure enough once the execution is completed we will see three actions occur as follows:

  1. A new View has been created in the list as shown below:

13

  1. List View gets Render as HTML in “printView” Div as we discussed above
  2. Export Query File is ready to be downloaded

14

Save the Query File

15

Open the Query File and Enable the Data Connection with SharePoint

16

And we will get all items hold by the view based on the query specified, in this current View I took all 10,000 items as shown below:

17

18

Though this is quite a simple approach which can be used to easily cater the custom data export requirements in SharePoint.

Code Snippet:

/sites/dev01/Shared%20Documents/jquery-1.7.1.min.js


function getViewAsHtml(viewId, viewTitle)
 {

var headers = {
 Accept: "application/json;odata=verbose",
 "Content-Type": "application/json;odata=verbose",
 "X-RequestDigest": jQuery("#__REQUESTDIGEST").val()
 };

var call = jQuery.ajax({
 url: _spPageContextInfo.webAbsoluteUrl
 + "/_api/Web/Lists/getbytitle('TestList')/Views('"+viewId+"')/renderAsHtml()",
 type: "GET",
 data: "json",
 headers: headers
 });

call.done(function(data, textStatus, jqXHR)
 {
 $('#viewTitle').html("

"+viewTitle +"

"); $('#printView').html(data.d.RenderAsHtml); window.location=_spPageContextInfo.webAbsoluteUrl + "/_vti_bin/owssvr.dll?CS=65001&Using=_layouts/15/query.iqy&List=%7B00361C78%2D4158%2D4A9B%2DA12D%2D8C55DE4E9079%7D&View=%7B"+viewId +"%7D&RootFolder=%2Fsites%2Fdev01%2FLists%2FTestList&CacheControl=1"; }); call.fail(failHandler); function failHandler(jqXHR, textStatus, errorThrown) { var response = JSON.parse(jqXHR.responseText); var message = response ? response.error.message.value : textStatus; alert("Call failed. Error : " + message); } } function createViews() { var headers = { Accept: "application/json;odata=verbose", "Content-Type": "application/json;odata=verbose", "X-RequestDigest": jQuery("#__REQUESTDIGEST").val() }; var viewName = "By Status" + Math.floor((Math.random() * 100) + 1); var call = jQuery.ajax({ url: _spPageContextInfo.webAbsoluteUrl + "/_api/Web/Lists/getbytitle('TestList')/Views", type: "POST", data: JSON.stringify({ "__metadata": { type: "SP.View" }, Title: viewName, 'PersonalView': false, 'ViewQuery':'', 'RowLimit': 3 }), headers: headers }); call.done(function(data, textStatus, jqXHR) { getViewAsHtml(data.d.Id, data.d.Title); }); call.fail(failHandler); function failHandler(jqXHR, textStatus, errorThrown) { var response = JSON.parse(jqXHR.responseText); var message = response ? response.error.message.value : textStatus; alert("Call failed. Error : " + message); } } $(document).ready(function() { //getViewAsHtml(); });
<br/> <br/> <br/>


Hope this will help someone in need…

SharePoint 2013 : Execute SharePoint Search Queries using CSOM

In this article we will explore the method of executing Search Queries using SharePoint Client Side Object Model. The code sample used in this article can be used in any kind of solution (Farm, Sandbox) or any kind of App (SharePoint Hosted, Cloud Hosted) executing in context of SharePoint.

Prerequisites:

  1. Fiddler Web Proxy should be installed. You can get Fiddler from http://www.telerik.com/download/fiddler

Like in other of the earlier articles we will start with creating new SharePoint Hosted App.

1

The next thing is to provide a simple UI for our implementation which allows the users to specify the Search Terms & execute the queries.

In order to keep the story simple we will take one input box to specify the Search Terms & one button to execute the query as shown below.

2 3

Now once we are done with the UI of the App, the next thing is to prepare a module that will execute the Search Queries and receive the response.

4

Following is the detail inspection of the above code snippet

  1. Initialize SharePoint Context variable (Step 1) then we need to
  2. Initialize the Query Object (Step 2) using the context variable created in Step 1.
  3. Set the Query Text (Step 3). This query text has been specified in the input box by the user executing the query.
  4. Initialize the Search Executor Object (Step 4) using the context variable created in Step 1. This object is solely responsible to execute Search Queries. This object contains a method “executeQuery” which takes query text as its parameter.

Now the next challenge is to identify how to code the next step, as it is dependent on response coming from the SharePoint REST End Point in return of the request executed in Step 4.

So the trick to first reviews the response coming from SharePoint using any Web Proxy. Being a big fan of Fiddler I must insist to make use of it to the purpose.

Below image is showing some sample data present in one of the lists called “Customer”.

5

For the sake of demo let’s pick “ALFKI” as Search Term. On clicking the “Executing Search using CSOM” , the Search Query gets issued to SharePoint End Point and if it is a success we will get the response for sure.

6

If we investigate the response in Fiddler we can see the data structure returned as a part of the response.

7

Based on this observation, we can read the data as shown in Step 5 above.

Once we receive the search results, it is just the matter of choice on how to display it. For the sake of this demo I am just displaying the search results in a div already added to the App UI.

8

And that’s it. We are all done here.

Though the scenario I mentioned here is quite simple, but the presence of Client Side Search APIs in SharePoint 2013 is proved to be very powerful and could be utilized to cater complex business requirements without using any custom code.

Hope this will help someone in need…


SharePoint 2013 : How to develop Custom Search Apps Using REST API

In this article we are going to deal with Search Scenarios using enhanced REST API in SharePoint 2013. To make the story more interesting I am going to make use of new App Model offered by SharePoint 2013. Here we will be going to explore SharePoint Hosted App which is one of the three types of Apps offered under SharePoint 2013 App Model. In this article we will cover a simple scenario where we will create a Custom Search (SharePoint Hosted) App based on SharePoint 2013 Search and REST API provided by SharePoint 2013, that will perform search on Crawl Data aggregated by the Search Crawler.

Prerequisites

  1. App Development Environment must be configured properly.
  2. SharePoint 2013 Search Service Application must be created and configured.
  3. Sample Data Sources must be created with in the Scope targeted by the crawler.
  4. Full Crawl must be finished.
  5. Fiddler Web Proxy should be installed. You can get Fiddler from http://www.telerik.com/download/fiddler

Following are the steps involved in the development of Custom Search App using REST API:

Step-1 : Start Visual Studio 2012/2013 and Select “App for SharePoint 2013” project template as shown below

1

Step-2 : Modify the Default.aspx Page and add the UI Elements for Search App. For the sake of simplicity I am using basic HTML for the presentation but we can design the UI as compelling as it needs to be by making use of enhanced UI support from HTML5 & CSS3.

2

Step-3: Next thing is to hook up the “Click” event of the button “btnExecuteSearchREST” with an event handler function as shown below:

3

Step-4:   Now lets’ do the step wise analysis of the actual plumbing

6

  1. Get the Search Term entered by the user and stored it in the variable “queryText”.
  2. Define Request Headers for the Web Request, Please Note that we mention “odata=verbose” as a part of the value for “Accept” Property, this is a new convention for Web Requests using REST API in SharePoint 2013 and it must be followed else it would produce the following error :

4

  1. Set “url” property to the URL of the site which is hosting this App using “_spPageContextInfo.webAbsoluteUrl”, you must have to memorize this object as you have to use it on every single page in SharePoint where you want to use the SharePoint Context. This simple object provides you a lot of useful information to work on as shown below

5

  1. Specify the Search Query using new End Point (_api/search/query/<searchTerm>) provided by SharePoint 2013.
  2. Read the results from the response object and save it to “rows” variable, based on the data structure returned by the response object. We can identify the data structure by analyzing the response object using Fiddler Web Proxy as shown after few steps down the line.
  3. We need to loop through the result set to read the Values based on the Keys returned.
  4. Lastly we need to display the records as required.

Optional: At this point you can make use of some of the JavaScript Frameworks like “Knockout.js” which is based on MVVM Pattern and has an excellent feature of dependency tracking, which allows you to write complex UI logic with much Lesser & Cleaner Code. You can learn Knockout very easily by following the link http://learn.knockoutjs.com/.

Step-5: With this we are all done with the code, now it’s time to build & deploy the App and see it in action. In order to test the Custom Search App, first verify the Data Source which contains the data related to our search term. In our case it is “Customers” List with a Column “ContactTitle” containing the Search Term “Owner” as shown below

7

Now specify the search term in textbox provided as a part of App UI and click “Execute Search using REST API” as shown below:

8

Before going to the search result in the “Result Panel” (which is a div on App UI), we should spend a few minutes to analyze the response object to determine what exactly is returning from the server against our request. If we view the response object in Fiddler as shown below, we will see a complete JSON Object containing the data in terms of Key/Value Pairs. This information is very important as this will help us to navigate the result set that we are interested in. Please Note that we utilize this information under Step-4 Point 5, where we are saving the result set from response object to local variable.

9

10

Finally if we see to the Result Panel we should be able to get the results based on the search term “Owner”.

11

This simple demo helps you to grasp the notion of how can we employ REST API while working with Custom Search Apps/Solutions.

Hope this will help someone in need…